
Notice
Recent Posts
Recent Comments
Link
yeon's blog
[Kotlin] 메인화면 레이아웃 (Navigation) 본문
1. 메인화면 꾸미기
activity_main.xml 전체코드
<?xml version="1.0" encoding="utf-8"?>
<androidx.constraintlayout.widget.ConstraintLayout xmlns:android="http://schemas.android.com/apk/res/android"
    xmlns:app="http://schemas.android.com/apk/res-auto"
    xmlns:tools="http://schemas.android.com/tools"
    android:layout_width="match_parent"
    android:layout_height="match_parent"
    tools:context=".MainActivity">

    <androidx.constraintlayout.widget.ConstraintLayout
        android:id="@+id/topBar"
        android:layout_width="match_parent"
        android:layout_height="60dp"
        app:layout_constraintTop_toTopOf="parent">

        <ImageView
            android:layout_width="200dp"
            android:layout_height="40dp"
            android:layout_margin="10dp"
            android:src="@drawable/min_logo"
            app:layout_constraintStart_toStartOf="parent"
            app:layout_constraintTop_toTopOf="parent" />

        <ImageView
            android:layout_width="30dp"
            android:layout_height="30dp"
            android:src="@drawable/main_menu"
            android:layout_marginTop="15dp"
            android:layout_marginRight="20dp"
            app:layout_constraintEnd_toEndOf="parent"
            app:layout_constraintTop_toTopOf="parent" />

    </androidx.constraintlayout.widget.ConstraintLayout>

    <LinearLayout
        android:layout_width="match_parent"
        android:layout_height="0.5dp"
        android:background="#999999"
        app:layout_constraintTop_toBottomOf="@+id/topBar"/>

    <androidx.fragment.app.FragmentContainerView
        android:id="@+id/fragmentContainerView"
        android:name="androidx.navigation.fragment.NavHostFragment"
        android:layout_width="match_parent"
        android:layout_height="match_parent"
        app:defaultNavHost="true"
        app:navGraph="@navigation/main_nav"
        android:layout_marginTop="60dp"/>

</androidx.constraintlayout.widget.ConstraintLayout>
2. Navigation 구현
main_nav.xml 파일을 Navigation으로 생성해준 후에 다음과 같이 다섯 개의 Fragment를 생성해준다.

각각의 Fragment 파일에서 다른 fragment로 이동하는 코드를 구현한다.
기능을 구현하기 전에 먼저 Fragment 화면을 꾸며주었다.

위와 같이 구현한 후에 아래 다섯개의 버튼을 눌렀을 때 노란색 선을 띄워 Fragment를 구분해주었다.
Fragment간의 이동 기능을 구현하기 위해서는 main_nav.xml 파일에서 아래와 같이 Fragment를 전부 화살표로 연결해주어야 한다.
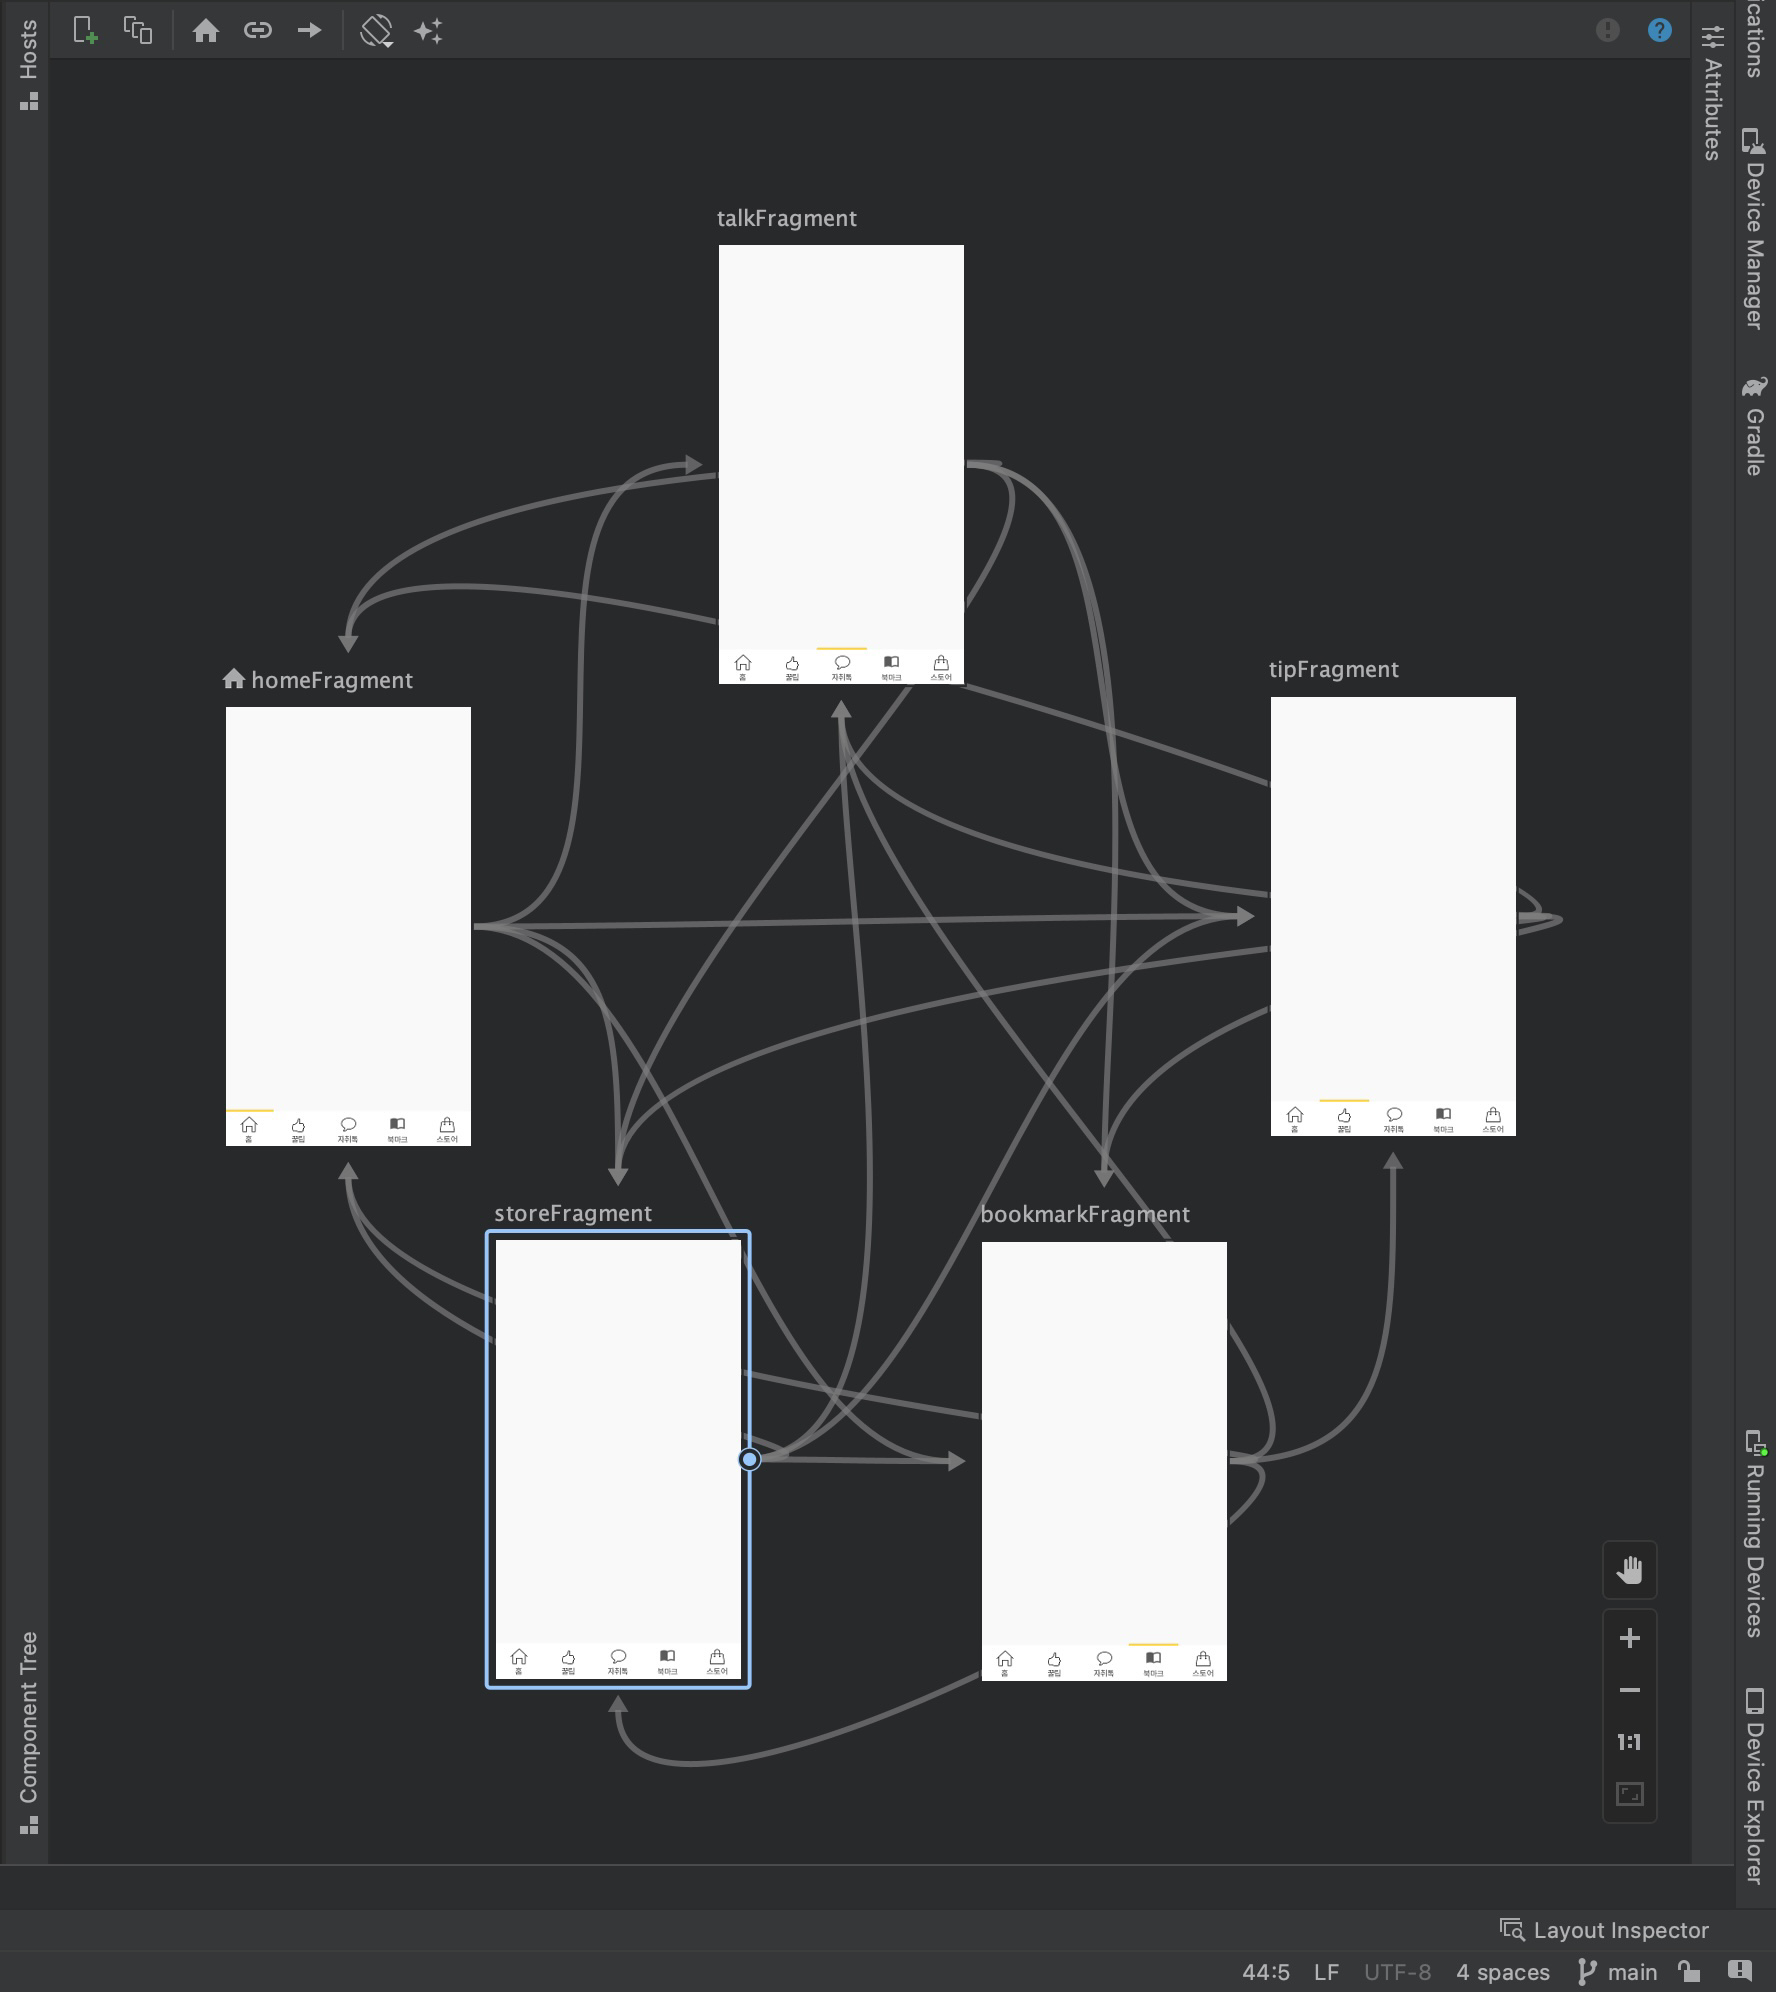
코드는 main_nav.xml, activity_home.xml과 HomeFragment만 첨부하겠다.
나머지들도 똑같이 반복해주면 되기 때문!
main_nav.xml 전체코드
<?xml version="1.0" encoding="utf-8"?>
<navigation xmlns:android="http://schemas.android.com/apk/res/android"
    xmlns:app="http://schemas.android.com/apk/res-auto"
    xmlns:tools="http://schemas.android.com/tools"
    android:id="@+id/main_nav"
    app:startDestination="@id/homeFragment">

    <fragment
        android:id="@+id/homeFragment"
        android:name="com.example.mysololife.fragments.HomeFragment"
        android:label="fragment_home"
        tools:layout="@layout/fragment_home" >
        <action
            android:id="@+id/action_homeFragment_to_talkFragment"
            app:destination="@id/talkFragment" />
        <action
            android:id="@+id/action_homeFragment_to_storeFragment"
            app:destination="@id/storeFragment" />
        <action
            android:id="@+id/action_homeFragment_to_bookmarkFragment"
            app:destination="@id/bookmarkFragment" />
        <action
            android:id="@+id/action_homeFragment_to_tipFragment"
            app:destination="@id/tipFragment" />
    </fragment>
    <fragment
        android:id="@+id/bookmarkFragment"
        android:name="com.example.mysololife.fragments.BookmarkFragment"
        android:label="fragment_bookmark"
        tools:layout="@layout/fragment_bookmark" >
        <action
            android:id="@+id/action_bookmarkFragment_to_storeFragment"
            app:destination="@id/storeFragment" />
        <action
            android:id="@+id/action_bookmarkFragment_to_tipFragment"
            app:destination="@id/tipFragment" />
        <action
            android:id="@+id/action_bookmarkFragment_to_homeFragment"
            app:destination="@id/homeFragment" />
        <action
            android:id="@+id/action_bookmarkFragment_to_talkFragment"
            app:destination="@id/talkFragment" />
    </fragment>
    <fragment
        android:id="@+id/storeFragment"
        android:name="com.example.mysololife.fragments.StoreFragment"
        android:label="fragment_store"
        tools:layout="@layout/fragment_store" >
        <action
            android:id="@+id/action_storeFragment_to_homeFragment"
            app:destination="@id/homeFragment" />
        <action
            android:id="@+id/action_storeFragment_to_bookmarkFragment"
            app:destination="@id/bookmarkFragment" />
        <action
            android:id="@+id/action_storeFragment_to_tipFragment"
            app:destination="@id/tipFragment" />
        <action
            android:id="@+id/action_storeFragment_to_talkFragment"
            app:destination="@id/talkFragment" />
    </fragment>
    <fragment
        android:id="@+id/talkFragment"
        android:name="com.example.mysololife.fragments.TalkFragment"
        android:label="fragment_talk"
        tools:layout="@layout/fragment_talk" >
        <action
            android:id="@+id/action_talkFragment_to_homeFragment"
            app:destination="@id/homeFragment" />
        <action
            android:id="@+id/action_talkFragment_to_tipFragment"
            app:destination="@id/tipFragment" />
        <action
            android:id="@+id/action_talkFragment_to_storeFragment"
            app:destination="@id/storeFragment" />
        <action
            android:id="@+id/action_talkFragment_to_bookmarkFragment"
            app:destination="@id/bookmarkFragment" />
    </fragment>
    <fragment
        android:id="@+id/tipFragment"
        android:name="com.example.mysololife.fragments.TipFragment"
        android:label="fragment_tip"
        tools:layout="@layout/fragment_tip" >
        <action
            android:id="@+id/action_tipFragment_to_talkFragment"
            app:destination="@id/talkFragment" />
        <action
            android:id="@+id/action_tipFragment_to_homeFragment"
            app:destination="@id/homeFragment" />
        <action
            android:id="@+id/action_tipFragment_to_bookmarkFragment"
            app:destination="@id/bookmarkFragment" />
        <action
            android:id="@+id/action_tipFragment_to_storeFragment"
            app:destination="@id/storeFragment" />
    </fragment>
</navigation>
각각의 Fragment들을 다른 Fragment들과 연결.
activity_home.xml 전체코드
<?xml version="1.0" encoding="utf-8"?>
<layout xmlns:tools="http://schemas.android.com/tools"
    xmlns:android="http://schemas.android.com/apk/res/android"
    xmlns:app="http://schemas.android.com/apk/res-auto">
    <FrameLayout
        android:layout_width="match_parent"
        android:layout_height="match_parent"
        tools:context=".fragments.HomeFragment">

        <!-- TODO: Update blank fragment layout -->
        <androidx.constraintlayout.widget.ConstraintLayout
            android:layout_width="match_parent"
            android:layout_height="match_parent">

            <LinearLayout
                android:layout_width="match_parent"
                android:layout_height="3dp"
                app:layout_constraintBottom_toTopOf="@+id/linearLayout">

                <LinearLayout
                    android:background="@color/yello"
                    android:layout_weight="1"
                    android:layout_width="match_parent"
                    android:layout_height="3dp" />

                <LinearLayout
                    android:layout_weight="1"
                    android:layout_width="match_parent"
                    android:layout_height="match_parent" />

                <LinearLayout
                    android:layout_weight="1"
                    android:layout_width="match_parent"
                    android:layout_height="match_parent" />

                <LinearLayout
                    android:layout_weight="1"
                    android:layout_width="match_parent"
                    android:layout_height="match_parent" />

                <LinearLayout
                    android:layout_weight="1"
                    android:layout_width="match_parent"
                    android:layout_height="match_parent" />

            </LinearLayout>

            <LinearLayout
                android:id="@+id/linearLayout"
                android:layout_width="match_parent"
                android:layout_height="60dp"
                android:background="@color/white"
                app:layout_constraintBottom_toBottomOf="parent">

                <ImageView
                    android:id="@+id/homeTap"
                    android:layout_width="match_parent"
                    android:layout_height="wrap_content"
                    android:layout_weight="1"
                    android:src="@drawable/bottom_hometap" />

                <ImageView
                    android:id="@+id/tipTap"
                    android:layout_width="match_parent"
                    android:layout_height="wrap_content"
                    android:layout_weight="1"
                    android:src="@drawable/bottom_goodtip" />

                <ImageView
                    android:id="@+id/talkTap"
                    android:layout_width="match_parent"
                    android:layout_height="wrap_content"
                    android:layout_weight="1"
                    android:src="@drawable/bottom_talk" />

                <ImageView
                    android:id="@+id/bookmarkTap"
                    android:layout_width="match_parent"
                    android:layout_height="wrap_content"
                    android:layout_weight="1"
                    android:src="@drawable/bottom_bookmark" />

                <ImageView
                    android:id="@+id/storeTap"
                    android:layout_width="match_parent"
                    android:layout_height="wrap_content"
                    android:layout_weight="1"
                    android:src="@drawable/bottom_store" />

            </LinearLayout>

        </androidx.constraintlayout.widget.ConstraintLayout>

    </FrameLayout>
</layout>
첫번째 LinearLayout은 해당 버튼을 클릭했을 때 버튼 위에 노란색 줄을 띄게 하여, 해당 버튼 화면에 들어왔음을 알려주기 위해 생성
두번째 LinearLayout은 아래쪽에 있는 다섯개의 버튼 생성
HomeFragment 전체코드
package com.example.mysololife.fragments

import android.os.Bundle
import androidx.fragment.app.Fragment
import android.view.LayoutInflater
import android.view.View
import android.view.ViewGroup
import androidx.databinding.DataBindingUtil
import androidx.navigation.findNavController
import com.example.mysololife.R
import com.example.mysololife.databinding.FragmentHomeBinding

class HomeFragment : Fragment() {

    private lateinit var binding: FragmentHomeBinding

    override fun onCreate(savedInstanceState: Bundle?) {
        super.onCreate(savedInstanceState)
    }

    override fun onCreateView(
        inflater: LayoutInflater, container: ViewGroup?,
        savedInstanceState: Bundle?
    ): View? {

        binding = DataBindingUtil.inflate(inflater, R.layout.fragment_home, container, false)

        binding.tipTap.setOnClickListener {
            it.findNavController().navigate(R.id.action_homeFragment_to_tipFragment)
        }

        binding.talkTap.setOnClickListener {
            it.findNavController().navigate(R.id.action_homeFragment_to_talkFragment)
        }

        binding.bookmarkTap.setOnClickListener {
            it.findNavController().navigate(R.id.action_homeFragment_to_bookmarkFragment)
        }

        binding.storeTap.setOnClickListener {
            it.findNavController().navigate(R.id.action_homeFragment_to_storeFragment)
        }

        return binding.root
    }
}
각각의 버튼을 눌렀을 때 해당 Fragment로 이동할 수 있도록 코드 구현!
'Kotlin > 커뮤니티 앱' 카테고리의 다른 글
| [Kotlin] 팁 페이지 (2) | 2024.01.12 |
|---|---|
| [Kotlin] Firebase 회원가입, 로그인, 로그아웃, 익명로그인 기능 구현 (2) | 2024.01.03 |
| [Kotlin] 레이아웃 구현 (1) | 2024.01.02 |
'Kotlin/커뮤니티 앱' Related Articles
more


