
yeon's blog
[Kotlin] Firebase 동작 방식 이해 (예제 앱 만들기) - Authentication 본문
예제 앱을 개발해 보면서 Firebase 동작 방식을 이해해보겠다!
먼저 Android Studio를 실행하여 새로운 프로젝트를 생성한다.

Empty View Acticity 테블릿을 통해 구현해 볼 예정이다.
Next 버튼을 누른 후 Project Name을 입력하고 생성해주면 된다.
바로 Firebase를 이용하기 위해 Android 프로젝트에 Firebase를 추가해줄 것이다.
추가 과정은 생략! 사이트 참고 → https://firebase.google.com/docs/android/setup
1. 회원가입 기능 구현
기능을 구현하기 전에 먼저 레이아웃을 구현해준다.
activity_main.xml 전체코드
<?xml version="1.0" encoding="utf-8"?>
<LinearLayout
    xmlns:android="http://schemas.android.com/apk/res/android"
    xmlns:app="http://schemas.android.com/apk/res-auto"
    xmlns:tools="http://schemas.android.com/tools"
    android:layout_width="match_parent"
    android:layout_height="match_parent"
    tools:context=".MainActivity"
    android:orientation="vertical">

    <EditText
        android:id="@+id/emailArea"
        android:hint="email"
        android:layout_width="match_parent"
        android:layout_height="wrap_content" />

    <EditText
        android:id="@+id/pwdArea"
        android:hint="pwd"
        android:layout_width="match_parent"
        android:layout_height="wrap_content" />

    <Button
        android:id="@+id/joinBtn"
        android:text="회원가입"
        android:layout_width="wrap_content"
        android:layout_height="wrap_content" />

</LinearLayout>
*기능 구현이 목적이므로 레이아웃은 형태만 만들고 디자인은 따로 하지 않겠다..ㅎㅎ
다음으로 MainActivity 파일에서 회원가입 기능을 구현해보겠다.
MainActivity 전체코드
package com.example.mysampleapp

import androidx.appcompat.app.AppCompatActivity
import android.os.Bundle
import android.widget.Button
import android.widget.Toast
import com.google.firebase.auth.FirebaseAuth
import com.google.firebase.auth.ktx.auth
import com.google.firebase.ktx.Firebase

class MainActivity : AppCompatActivity() {

    private lateinit var auth: FirebaseAuth

    override fun onCreate(savedInstanceState: Bundle?) {

        auth = Firebase.auth

        super.onCreate(savedInstanceState)
        setContentView(R.layout.activity_main)

		// 회원가입
        val joinBtn = findViewById<Button>(R.id.joinBtn)
        joinBtn.setOnClickListener {
            auth.createUserWithEmailAndPassword("test@gmail.com", "password12")
                .addOnCompleteListener(this) { task ->
                    if (task.isSuccessful) {
                        Toast.makeText(this, "성공", Toast.LENGTH_SHORT).show()
                    } else {
                        Toast.makeText(this, "실패", Toast.LENGTH_SHORT).show()
                    }
                }
        }

    }
}
Android에서 Firebase 인증을 시작하기 위해서는 https://firebase.google.com/docs/auth/android/start 이 사이트를 참고하면 된다.
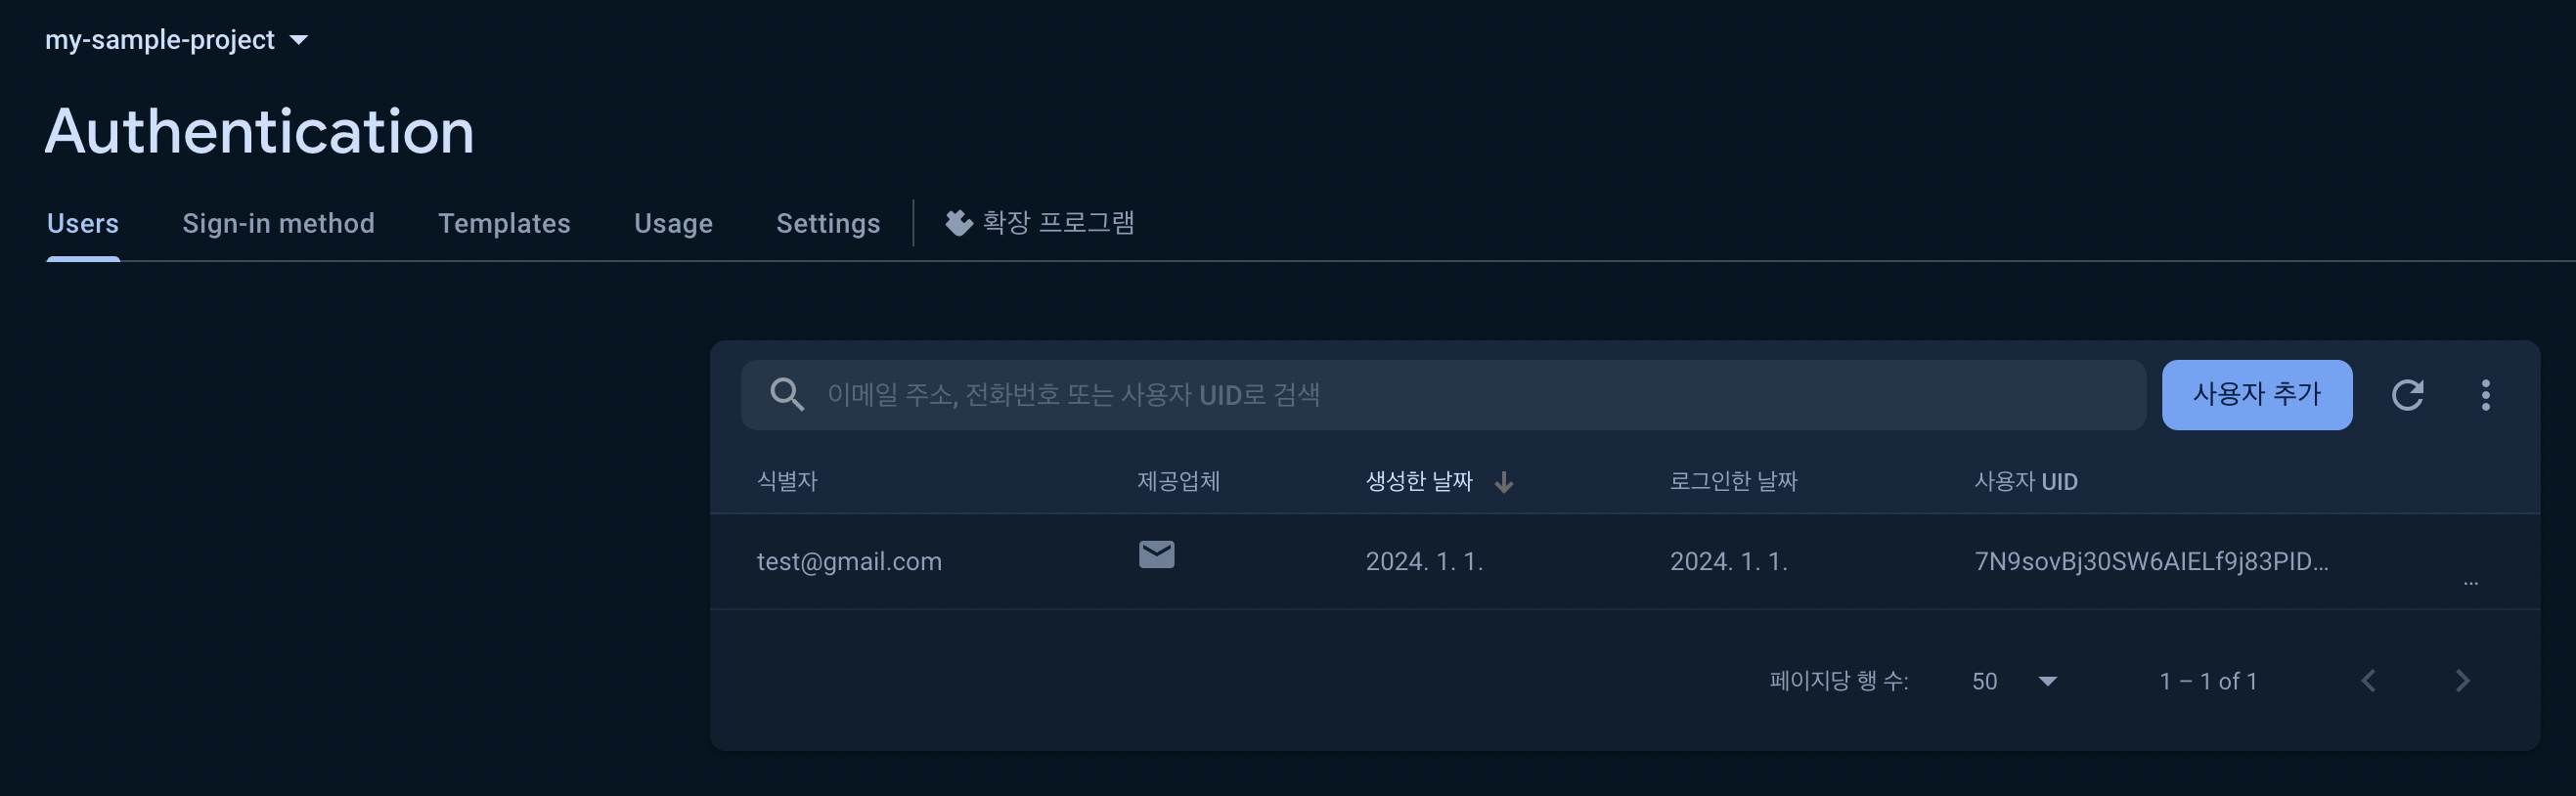
간단히 설명해보면 먼저 Firebase에서 본인이 만든 콘솔로 이동한 후 사이드바에 있는 Authentication을 시작 해주어야 한다.

그리고 예제 앱에서는 이메일, 패스워드를 이용해 회원가입을 구현할 것이므로 이메일/비밀번호 제공업체를 추가해 주었다.
설정 후 내 프로젝트에서 이용하기 위해서는 위에 사이트를 참고해야 한다.
참고해서 dependency를 추가해주고 이용 방법을 알아내자!
잘 연결이 되었다면 위의 MainActivity 코드를 작성해 프로그램을 실행했을 때, 회원가입 버튼을 누르면 Firebase Authentication Users에 다음과 같이 정보가 들어갈 것이다.
위의 코드는 정보가 잘 들어가는지 확인하기 위함이었다. 이제 email, pwd를 받아오는 방법을 알아보자!
MainActivity 전체코드
package com.example.mysampleapp

import androidx.appcompat.app.AppCompatActivity
import android.os.Bundle
import android.widget.Button
import android.widget.EditText
import android.widget.Toast
import androidx.databinding.DataBindingUtil
import com.example.mysampleapp.databinding.ActivityMainBinding
import com.google.firebase.auth.FirebaseAuth
import com.google.firebase.auth.ktx.auth
import com.google.firebase.ktx.Firebase

class MainActivity : AppCompatActivity() {

    private lateinit var auth: FirebaseAuth

    private lateinit var binding: ActivityMainBinding

    override fun onCreate(savedInstanceState: Bundle?) {

        auth = Firebase.auth

        super.onCreate(savedInstanceState)
        setContentView(R.layout.activity_main)

        binding = DataBindingUtil.setContentView(this, R.layout.activity_main)

		// 회원가입
        val joinBtn = findViewById<Button>(R.id.joinBtn)
        joinBtn.setOnClickListener {

//            // email, pwd를 받아오기
//            // 첫번째 방법
//            val email = findViewById<EditText>(R.id.emailArea)
//            val pwd = findViewById<EditText>(R.id.pwdArea)

            // 두번째 방법
            val email = binding.emailArea
            val pwd = binding.pwdArea

            auth.createUserWithEmailAndPassword(email.text.toString(), pwd.text.toString())
                .addOnCompleteListener(this) { task ->
                    if (task.isSuccessful) {
                        Toast.makeText(this, "성공", Toast.LENGTH_SHORT).show()
                    } else {
                        Toast.makeText(this, "실패", Toast.LENGTH_SHORT).show()
                    }
                }
        }

    }
}
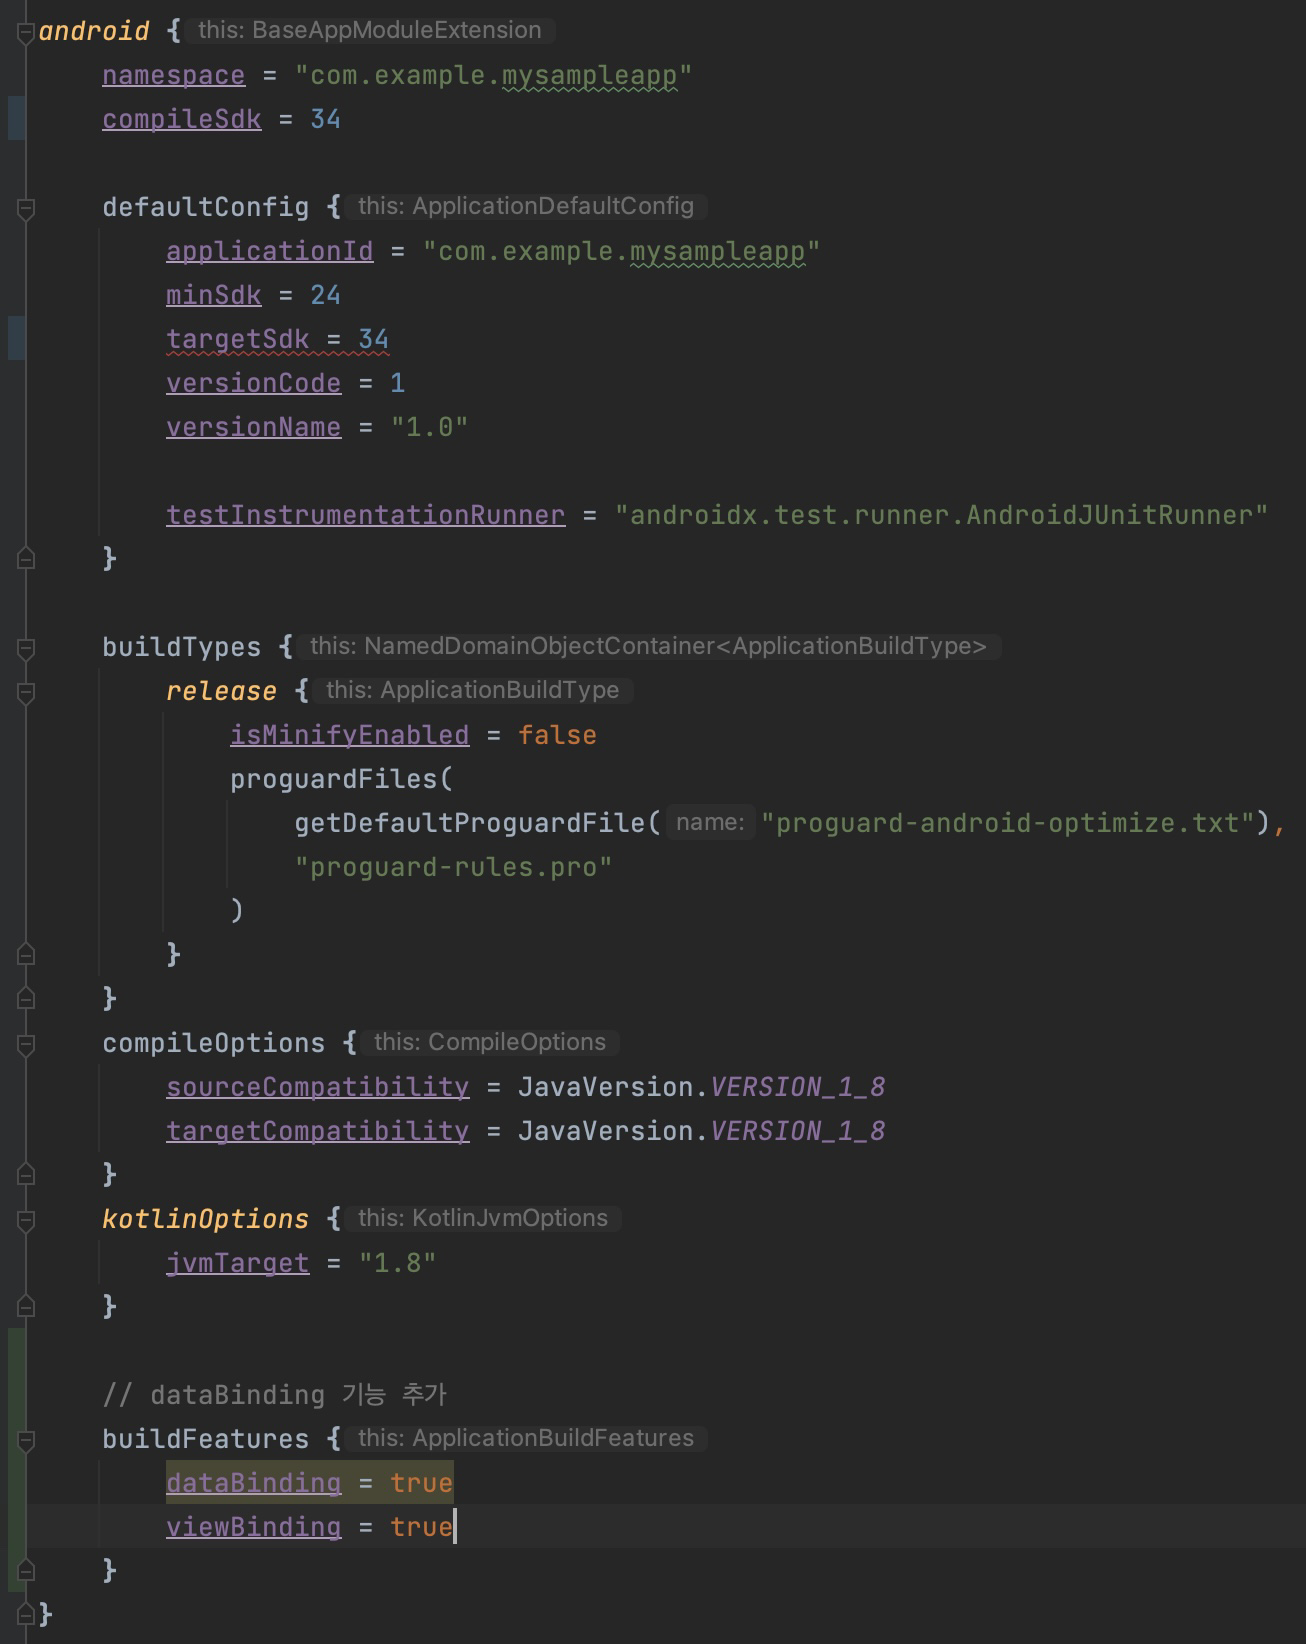
두번째 방법을 이용하기 위해서는 두가지 설정이 필요하다.
1) build.gradle(Module: mySampleApp.app) 부분에 databinding 기능을 추가해 주어야 한다.
2) activity_main.xml 파일에서 코드들을 <layout></layout>으로 감싸주어야 한다.
<?xml version="1.0" encoding="utf-8"?>
<layout>
    <LinearLayout
        xmlns:android="http://schemas.android.com/apk/res/android"
        xmlns:app="http://schemas.android.com/apk/res-auto"
        xmlns:tools="http://schemas.android.com/tools"
        android:layout_width="match_parent"
        android:layout_height="match_parent"
        tools:context=".MainActivity"
        android:orientation="vertical">

        <EditText
            android:id="@+id/emailArea"
            android:hint="email"
            android:layout_width="match_parent"
            android:layout_height="wrap_content" />

        <EditText
            android:id="@+id/pwdArea"
            android:hint="pwd"
            android:layout_width="match_parent"
            android:layout_height="wrap_content" />

        <Button
            android:id="@+id/joinBtn"
            android:text="회원가입"
            android:layout_width="wrap_content"
            android:layout_height="wrap_content" />

    </LinearLayout>
</layout>
2. 로그인 / 로그아웃 기능 구현
앞에서 설정한 것을 이용하기 때문에 따로 설정할 것이 없다!! 바로 코드로 드가보자
먼저 회원가입 버튼 처럼 로그인, 로그아웃 버튼을 만들어준다.
activity_main.xml 추가코드
        <Button
            android:id="@+id/loginBtn"
            android:text="  로그인  "
            android:layout_width="wrap_content"
            android:layout_height="wrap_content" />

        <Button
            android:id="@+id/logoutBtn"
            android:text="로그아웃"
            android:layout_width="wrap_content"
            android:layout_height="wrap_content" />
로그인, 로그아웃 기능은 다음과 같이 구현할 수 있다.
아래 사이트에서 '기존 사용자 로그인 부분'을 참고하면 된다.
https://firebase.google.com/docs/auth/android/start?hl=ko
MainActivity 추가코드
	// 로그인
        binding.loginBtn.setOnClickListener {

            val email = binding.emailArea
            val pwd = binding.pwdArea

            auth.signInWithEmailAndPassword(email.text.toString(), pwd.text.toString())
                .addOnCompleteListener(this) { task ->
                    if (task.isSuccessful) {
                        Toast.makeText(this, "성공", Toast.LENGTH_SHORT).show()
                    } else {
                        Toast.makeText(this, "실패", Toast.LENGTH_SHORT).show()
                    }
                }

        }

        // 로그아웃
        binding.logoutBtn.setOnClickListener {

            auth.signOut()

        }
'Kotlin > Kotlin 개념' 카테고리의 다른 글
| [Kotlin] Firebase 동작 방식 이해 (예제 앱 만들기) - Realtime Database (0) | 2024.01.02 |
|---|---|
| [Kotlin] Firebase? (0) | 2024.01.01 |
